 how-to
5 Steps to Protect Bath Stone During Scaffolding
Last Updated: October 26, 2026
Quick Summary
To protect Bath stone scaffolding, assess your stone condition, design scaffold ties that minimise face contact through leave-outs or bespoke masonry ties, install at least 50mm closed-cell foam padding and breathable sheeting, protect ground with plywood, and inspect weekly for moisture and damage.
- Use leave-outs into sound mortar or bespoke ties designed for masonry to avoid drilling through the stone face
- Install at least 50mm closed-cell foam padding on all poles and tie plates that contact the stone
- Use breathable or ventilated sheeting to prevent moisture trapping, and check weekly for compression, water pooling and staining
- Place at least 50mm plywood under each scaffold leg and extending 500mm beyond to protect paving and ground
- Photograph stonework before, during and after scaffolding to document condition and protect against damage disputes
Table of Contents
- Why Bath Stone Needs Special Protection During Scaffolding
- Step 1: Assess Your Stone and Plan Scaffold Tie Design for Stonework
- Step 2: Install Scaffold Padding and Protective Sheeting
- Step 3: Protect Ground and Patios with Ground Protection for Scaffolding
- Step 4: Plan Temporary Roofs for Heritage Buildings
- Step 5: Inspect, Document, and Monitor Throughout the Project
- Getting Your Bath Stone Protection Plan in Place
- Frequently Asked Questions
Why Bath Stone Needs Special Protection During Scaffolding
Bath stone's warm, golden appearance defines period properties across the region, but it is porous, relatively soft, and highly susceptible to damage, which is why you must protect Bath stone scaffolding with care. Scaffold poles, ties, and boards pressing against Bath stone leave marks, chips, and stains that are difficult or impossible to repair without professional stone work.
At Able Scaffolding Bath, we understand that protecting the stonework matters as much as providing access on heritage projects. A well-planned scaffold leaves a building looking untouched; a poorly planned one leaves scars for decades. Here are the five steps we use to protect Bath stone throughout the scaffolding process.
Step 1: Assess Your Stone and Plan Scaffold Tie Design for Stonework
Before a single pole goes up, understand what you're protecting and design your scaffold tie strategy accordingly.
Bath stone varies in hardness and weathering by age, bed and exposure. Stone from the Combe Down and Bathampton Down mines was historically selected for different courses, and older buildings often have softer, more weathered faces that mark easily.
The critical decision is how you attach the scaffold to the building. Traditional through-ties pass completely through the wall and anchor inside, creating permanent holes that must be made good.
Tie options for period properties, in rough order of intervention:
- Bespoke ties designed for masonry: Distribute load across a wider area and minimise contact stress. More expensive, but often justified on listed or highly visible façades.
- Leave-outs: Fixings that slot into pre-drilled holes in the mortar joints rather than through the stone, keeping damage to mortar, which is cheaper to repair than chipped stone. Holes must be drilled at the correct diameter and angle, and the mortar must be sound enough to take the load.
- Padded tie plates: Metal plates with foam or rubber padding that spread the load and reduce contact damage, but still rely on the stone face, so best suited to sound, flat masonry.
- Buttress or frame ties: Where geometry allows, ties can be taken to internal floors, joists or an independent frame, avoiding face contact altogether but requiring structural assessment.
How to decide:
- Assess stone condition and load path. If the face is soft, friable or cracked, face-bearing ties are high risk; prefer leave-outs into sound mortar or a frame that avoids the face.
- Check tie spacing and loads. Spacing is governed by the temporary works design, not convenience. The design should state the working load per tie and the fixing capacity in the actual masonry.
- Consider duration and exposure. A short-term project on sound stone might use simple padded ties; a long-term project on a listed building with soft stone should use bespoke ties or leave-outs designed by a specialist.
- Check heritage consent. For listed buildings, tie positions and fixing methods may need agreement with the conservation officer before work starts, often via a method statement covering drilling, dust control, making good and mortar matching.
- Know when to call in a structural engineer. If masonry capacity is uncertain, the building has moved, or the scaffold is tall or heavily loaded, a temporary works engineer should design the tie system.
Document your tie design in writing before erection begins: each tie's location, material, fixing method, protection method and make-good procedure.
If you are unsure which tie approach suits your building, ask your scaffolder to put the tie design in writing before any drilling begins.
Each tie option offers different levels of protection and intervention for Bath stone masonry.
| Tie Option | How It Works | Best For |
|---|---|---|
| Bespoke ties for masonry | Distribute load across wider area, minimise contact stress | Listed or highly visible façades |
| Leave-outs | Fixings slot into pre-drilled mortar joints | Sound mortar, avoiding stone face |
| Padded tie plates | Metal plates with foam or rubber padding spread load | Sound, flat masonry |
| Buttress or frame ties | Ties taken to internal floors, joists or independent frame | Avoiding face contact altogether |
Step 2: Install Scaffold Padding and Protective Sheeting
Once the tie design is agreed, the next layer is the physical barrier between scaffold and stone.
Understand what Bath stone does under a scaffold. It is a porous oolitic limestone, relatively soft compared with granite or engineering brick, and faces three risks:
- Pressure and point loading from poles, boards and tie plates pressing against the face.
- Abrasion and vibration as tubes and fittings are moved during erection, use and dismantling.
- Moisture and staining where coverings trap water or padding leaches colour or tannin into the pores.
Generic timber, foam and plastic sheeting can address one risk while worsening another.
Padding: what to use and what to avoid.
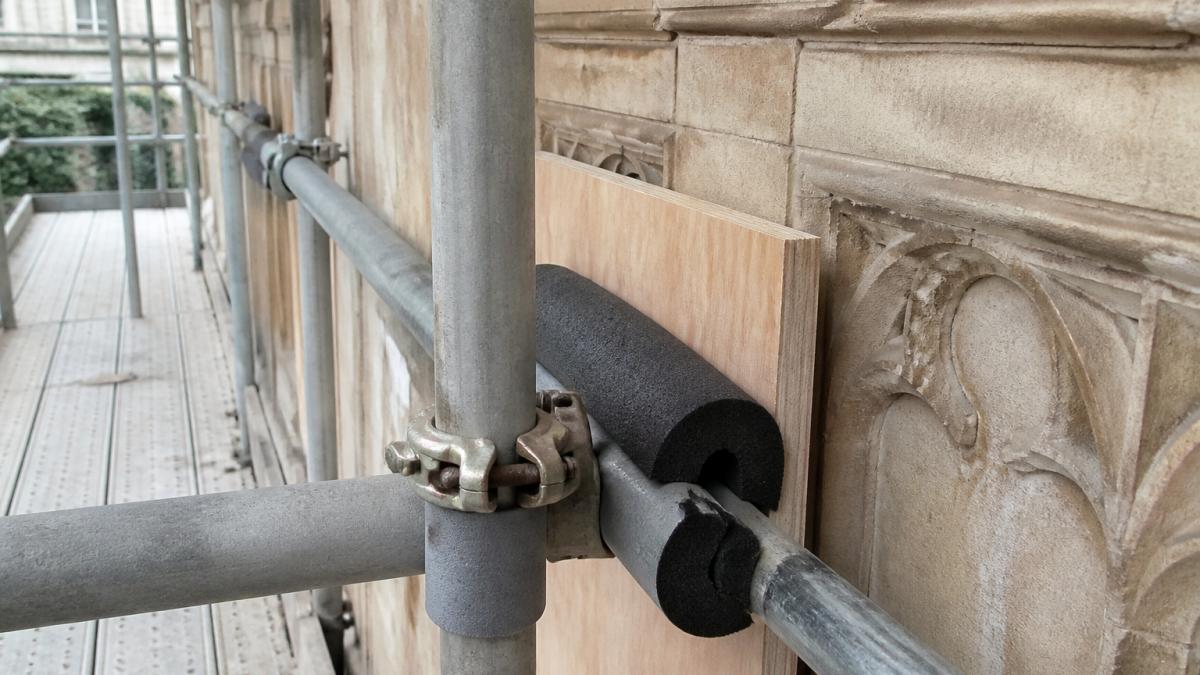
Closed-cell foam is the most common padding: soft enough to cushion contact, dense enough to resist compression over weeks or months.
Avoid materials that stain or transfer colour.
Sheeting: breathable, not sealed.
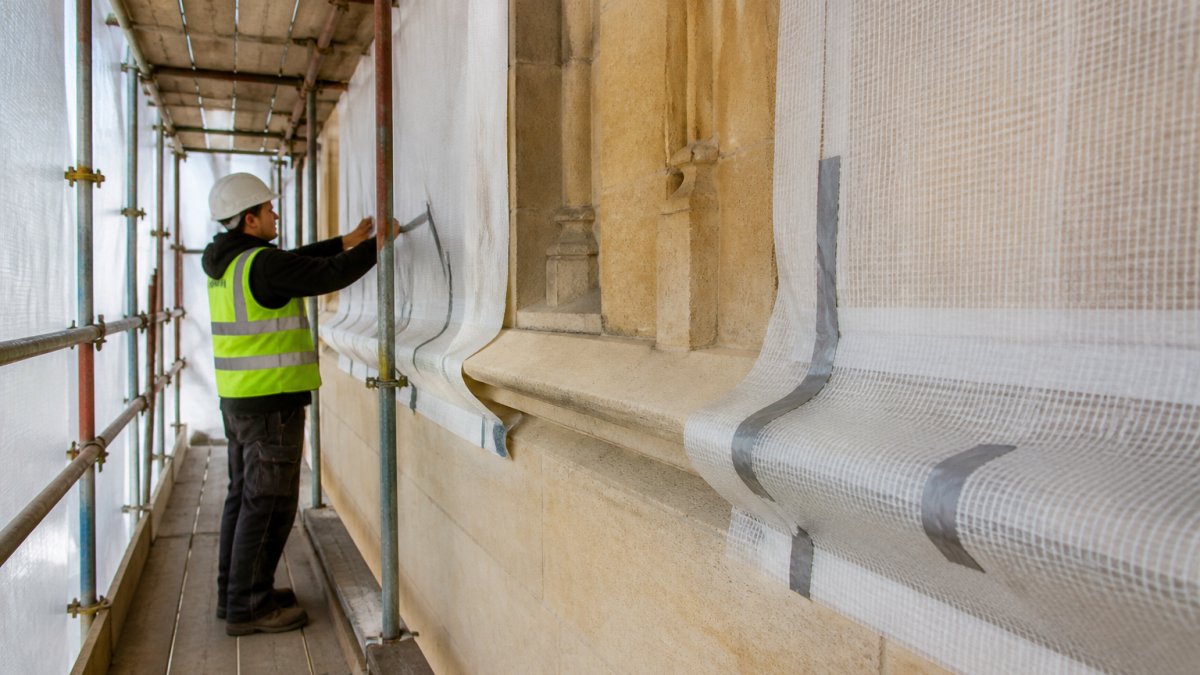
Protective sheeting shields the stone from weather, reduces dust and debris contact, and reminds workers to be careful.
Use a breathable membrane or vapour-permeable sheet where covering sits close to the stone for more than a few days.
Installation sequence:
- Apply padding to all poles, boards and tie plates that will contact the stone.
- Secure padding with adhesive or strapping so it doesn't shift during erection.
- Install breathable or ventilated sheeting before the scaffold is fully loaded.
- Overlap sheeting at corners and joints, with a slight fall at the top to shed water away from the façade.
- Leave a ventilated gap behind solid boards so moisture can escape.
- Check padding and sheeting weekly for damage, compression or trapped moisture.
Inspection and moisture checks.
Rain finds gaps, frost stresses materials and wind works at loose edges.
At each inspection, check for:
Free, no-obligation quotations →
- compressed or displaced padding;
- water pooling on sheeting or behind boards;
- damp patches or dark staining beneath coverings;
- loose fixings or flapping edges;
- abrasion dust or chips at contact points.
If moisture is trapped, don't simply tighten the sheet.
Step 3: Protect Ground and Patios with Ground Protection for Scaffolding
Damage to Bath stone isn't limited to the façade. Patio flags, pathway stones and ground-floor masonry often bear the weight of scaffold bases and foot traffic.
Ground protection for scaffolding stops scaffold feet sinking into soft ground, which can destabilise the structure and damage underlying stone or brick, and protects paving from being crushed or stained.
The method depends on what's underneath. On firm soil or grass, use scaffold boards or plywood laid flat to distribute the load.
Place ground protection before erection begins, under each scaffold leg and extending at least 500mm beyond the leg footprint.
Don't assume a patio or pathway can absorb the weight.
Step 4: Plan Temporary Roofs for Heritage Buildings
For roof work, chimney repairs or guttering on period properties, a temporary roof is essential protection for the interior and the stonework below. Learn more about scaffolding safety on heritage sites to ensure your temporary roof and scaffold system work together safely.
A temporary roof is a weather-tight covering, usually polycarbonate panels or heavy-duty tarpaulin on a frame, sitting above the scaffold to keep rain off during the work.
The key is ensuring the roof structure doesn't impose additional load or damage on the building it protects.
Specify the design early: it affects scaffold height, tie points and erection sequence. A well-designed temporary roof is expensive but saves far more in potential water damage and remedial stone work.
Step 5: Inspect, Document, and Monitor Throughout the Project
Protection doesn't end once the scaffold is erected. Ongoing inspection catches problems before they become expensive repairs.
Establish an inspection routine:
- Weekly visual checks: Look for gaps in sheeting, compressed padding, water pooling or visible stone damage
- After heavy rain or wind: Check that weather hasn't dislodged sheeting or damaged padding
- Before and after each work phase: Photograph the stonework
- Monthly detailed inspection: Remove samples of protective material to check for moisture or staining underneath
Document everything. Photograph the stonework before scaffolding goes up, at regular intervals during the project, and after dismantling. This record is invaluable if a dispute arises about responsibility for damage.
Track findings on a simple checklist: date, location, condition of protective materials, visible damage and actions taken. Share it with your scaffolder and main contractor; transparency protects everyone.
If you spot a chip, a stain or water seeping behind the sheeting, address it immediately. Small problems are cheap to fix; ignored ones become expensive restoration work after the scaffold comes down.
Getting Your Bath Stone Protection Plan in Place
To protect Bath stone scaffolding during construction isn't complicated, but it requires planning and attention to detail.
The investment in proper protection is small compared to repairing chip damage, staining or water ingress on a historic building. A well-protected project leaves your stonework unmarked and your building intact.
If you're planning scaffolding work on a Bath stone property, Able Scaffolding Bath's services include design and erection tailored to heritage buildings.
Get a free quote for your project. No obligation, no pressure. Just honest advice on how to protect your building.
Protecting your Bath stone during scaffolding means thinking ahead about tie design, padding, weather protection and ongoing inspection. Able Scaffolding Bath has 35 years of experience planning scaffold access on period properties across the region.
Frequently Asked Questions
How do you protect Bath stone during scaffolding?
Protect Bath stone during scaffolding through a combination of methods: use bespoke scaffold ties designed for masonry rather than standard fixings, install foam padding or laminated wood at all contact points, cover the façade with protective sheeting, and apply temporary weather barriers if weather exposure is prolonged. For porous limestone, avoid direct contact between raw wood and stone, as acidic tannins can cause staining. Inspect daily and document any damage with photographs.
Can scaffolding be tied into Bath stone?
Yes, but only with bespoke ties designed specifically for masonry. Standard scaffold ties risk creating stress points that chip or crack porous limestone. Bespoke ties distribute load more evenly across the stone surface and are set at precise locations away from decorative elements, repointing joints, and glazing leave-outs. A structural engineer or conservation specialist should assess tie locations on listed buildings or historic properties to ensure compliance with heritage requirements.
What protection should be used between scaffolding and a stone wall?
Use a multi-layer approach: place foam padding (minimum 25 mm thick) directly against the stone, followed by laminated plywood or timber boards to distribute pressure. Avoid raw wood, which can stain porous limestone through tannin leaching. For longer-term projects, add protective sheeting or breathable membranes to shield the façade from weather and abrasion. Change padding regularly if it becomes compressed, as worn protection loses its ability to prevent impact damage.
How should a patio be protected from scaffolding?
Protect patios and ground areas by laying heavy-duty plywood sheets or purpose-made ground protection boards before scaffold erection. These distribute the load and prevent scaffold feet from sinking into or damaging the surface. For heritage patios with original stone or period materials, use thicker protection (minimum 18 mm plywood) and inspect beneath it weekly for moisture or settling. Remove protection promptly after dismantling to allow the ground to dry and settle naturally.